To fix scratched heel surfaces, start by evaluating the scratch type. Clean the area with a damp cloth and mild soap. For minor scratches, apply shoe polish, buffing afterward for shine. For deeper scratches, use a leather conditioner to restore softness or a scratch repair kit for a more thorough approach. Buff with varying sandpaper grits to smooth imperfections, then seal with wax or sealant. Continue exploring methods to guarantee a successful repair.
Assessing the Damage: Understanding Scratch Types
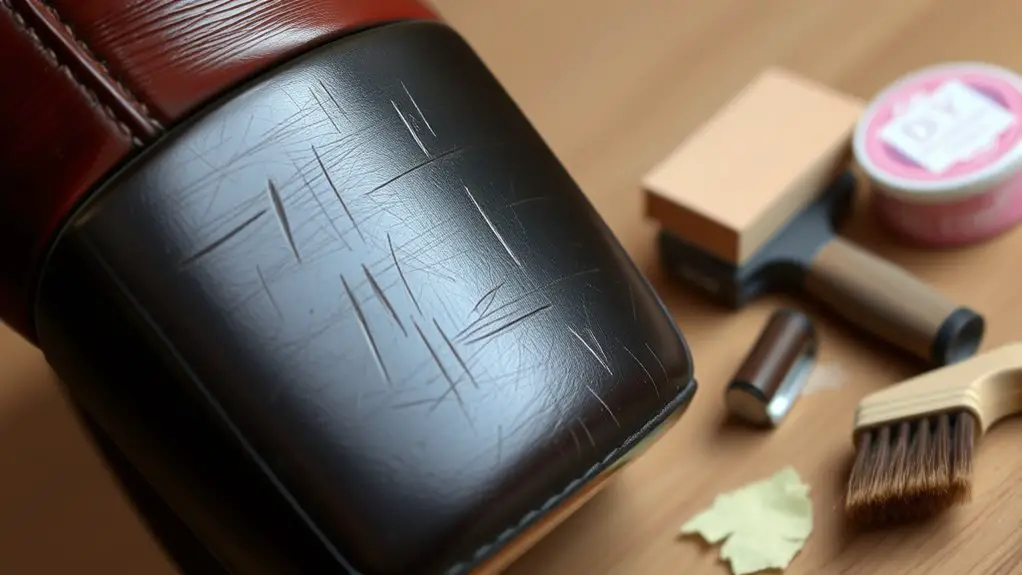
When you notice scratches on your heel surfaces, it’s essential to first evaluate the damage, as different types of scratches require distinct repair methods. Start by gauging the scratch severity: are they superficial, affecting only the finish, or deeper, penetrating the material? Superficial scratches usually require minimal intervention, such as polishing or buffing. For deeper scratches, you’ll need to contemplate more extensive repair methods, like filling in gaps or re-dyeing the area.
Take note of the material of your heel surfaces, as this can influence the repair methods you choose. Leather, for instance, may benefit from a leather conditioner post-repair, while synthetic materials might need a different approach. Knowing the severity and material type will guide you in selecting the right products and techniques, ensuring a successful repair process. By accurately evaluating the damage, you’ll save time and effort while achieving ideal results.
Cleaning the Surface: Preparing for Repair
Before starting any repair, you’ll need to gather the necessary supplies, such as a soft cloth, mild soap, and a brush. Carefully remove dirt and debris from the scratched area to guarantee a clean surface for repair. Once cleaned, inspect the damage closely to determine the extent of the scratches and plan your next steps effectively.
Gather Necessary Supplies
To effectively repair scratched heel surfaces, you’ll need to gather a few essential supplies that will facilitate the cleaning process. Start by selecting materials like a soft cloth, mild soap, and a small bowl for mixing. These will help you prepare the surface for repair. Next, gathering tools is vital; you’ll want a soft-bristled brush to dislodge any ingrained dirt and a pair of tweezers for removing stubborn debris. Additionally, having a microfiber cloth on hand will guarantee you can wipe down the surface without scratching it further. Don’t forget to get a small container for any cleaning solution you may need to create. With these supplies ready, you’ll be set for an effective cleaning process.
Remove Dirt and Debris
Once you’ve gathered the necessary supplies, the next step is to effectively remove any dirt and debris from the scratched heel surface. Start by using a soft brush or cloth to gently sweep away loose dirt. For stubborn debris, a damp cloth with mild soap can facilitate the dirt removal process. Make certain to avoid saturating the surface; excess moisture can cause further damage. After wiping, use a dry cloth to guarantee no residue remains. Pay special attention to crevices where dirt may accumulate. Complete the debris cleanup by allowing the surface to dry completely before proceeding to inspect for damage. This thorough cleaning step is vital for achieving the best results in your repair efforts.
Inspect for Damage
After you’ve cleaned the scratched heel surface, it’s essential to carefully inspect for damage to determine the best repair method. A thorough damage assessment is crucial; look for not just scratches but also any deeper gouges or fractures that may require special attention. Conduct a surface inspection by running your fingers over the heel to feel for irregularities.
| Damage Type | Repair Method |
|---|---|
| Minor Scratches | Sanding and Polishing |
| Deep Gouges | Filling Compound |
| Cracks | Epoxy Adhesive |
| Material Wear | Replacement Parts |
Using Shoe Polish: A Quick Fix for Minor Scratches
Shoe polish can be a game changer for minor scratches on heel surfaces, offering a quick and effective solution. To start, choose the right shoe polish type—liquid, cream, or wax—depending on your heel material. Cream polishes work well for leather, while wax offers a durable finish.
Begin by cleaning the area around the scratch to remove dirt or debris. Apply a small amount of polish to a soft cloth or applicator, using a circular motion to work it into the scratch. Confirm even coverage, but avoid over-applying, as this can lead to a messy finish.
After application, let the polish sit for a few minutes to dry. Once dry, buff the area with a clean cloth to enhance shine and blend the repair with the surrounding surface. This quick fix can considerably improve the appearance of your heels, making them look fresh and well-maintained.
Applying a Leather Conditioner: Restoring Shine and Softness
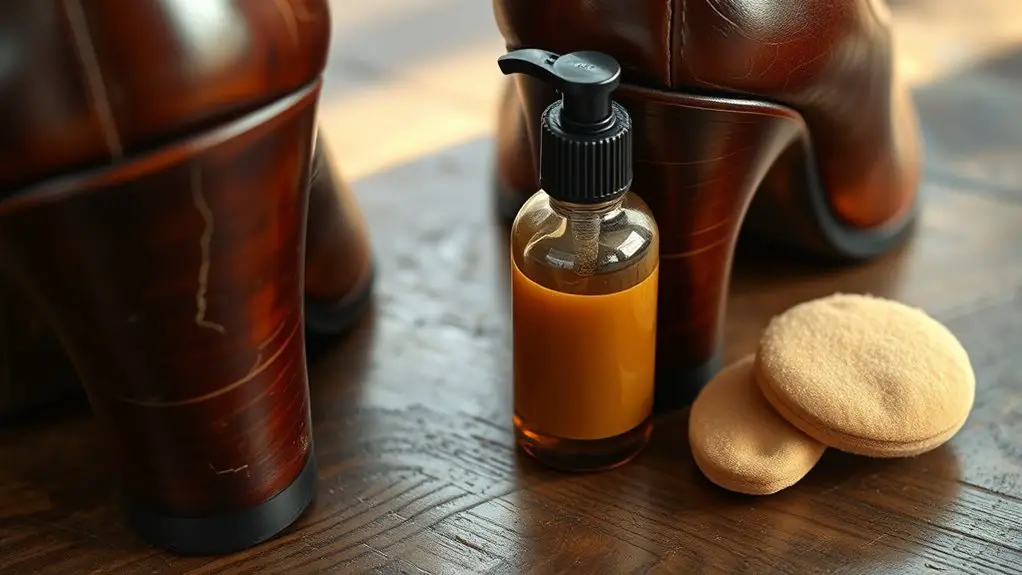
Although scratches can mar the appearance of your leather heels, applying a leather conditioner can effectively restore both shine and softness. First, identify the leather type—be it full-grain, top-grain, or corrected grain—as this influences the conditioning product you choose. For example, full-grain leather benefits from natural conditioners, preserving its breathability.
Before applying, clean the surface with a damp cloth to remove any dirt or debris. Then, use a soft cloth to apply the conditioner evenly, focusing on scratched areas. Allow it to absorb for the manufacturer-recommended time, usually around 10-15 minutes.
To maintain your heels’ appearance, consider conditioning every 3-6 months, depending on wear frequency and environmental factors. Regular conditioning not only restores shine but also extends the lifespan of your leather by preventing it from drying out and cracking.
Utilizing a Scratch Repair Kit: Step-by-Step Guide
A scratch repair kit can be a game-changer for restoring your leather heels, especially if you’re dealing with multiple scratches. To effectively utilize your kit, follow these steps:
- Clean the Area: Use a soft cloth and mild soap to remove dirt and oils from the scratched surface. Allow it to dry completely.
- Apply Scratch Repair Solution: Depending on your kit options, you may have a liquid, wax, or pen. Apply the scratch repair solution directly onto the scratch, using a small applicator or your fingertip, blending it with the surrounding leather.
- Buff and Finish: Once dry, buff the area with a clean, soft cloth to restore shine and blend the repair.
Always refer to the instructions specific to your scratch repair kit for best results. With patience and precision, you’ll have your heels looking as good as new!
DIY Wood Filler for Hard Floors: Filling Deeper Scratches
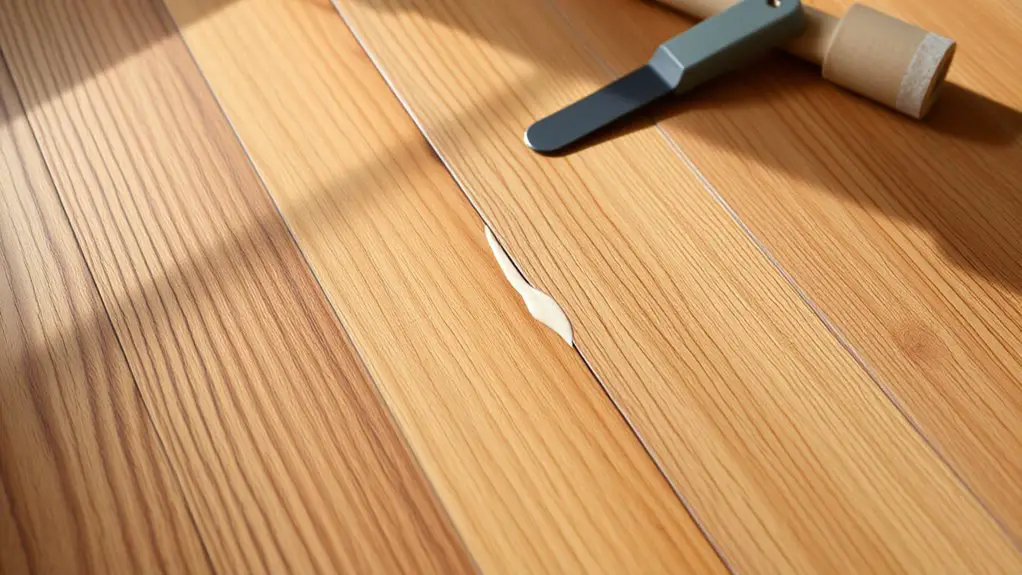
When dealing with deeper scratches in hard floors, choosing the right wood filler is essential for a successful repair. You’ll want to take into account the filler’s color, texture, and drying time to guarantee it blends seamlessly with your floor’s finish. Once you’ve selected the appropriate filler, applying it correctly will be key to achieving a smooth and durable surface.
Choosing the Right Filler
Choosing the right filler for deeper scratches in hard floors is essential, as it not only restores the surface but also guarantees durability and longevity. When selecting a filler, consider the following:
- Filler Types: Choose between epoxy, latex, or polyurethane fillers based on the depth and location of the scratch. Epoxy is best for deep scratches, while latex works for surface imperfections.
- Color Match: Confirm the filler matches your floor color. Many brands offer color-matching options to blend seamlessly.
- Drying Time: Check the drying time for your chosen filler. Quick-drying options can speed up your project but may require careful application.
Application Techniques Explained
While filling deeper scratches in hard floors, it’s crucial to follow precise application techniques to guarantee a smooth and lasting repair. Start by cleaning the area thoroughly to remove dirt and debris. Using a putty knife, apply the wood filler directly into the scratch, ensuring you overfill slightly to account for shrinkage. Smooth the filler with the knife, making it level with the surrounding surface. Allow it to dry completely according to the manufacturer’s instructions. Once dry, sand the area gently with fine-grit sandpaper for a seamless finish. Finally, consider applying a compatible floor finish to match the surrounding area. These application techniques are essential for effective repair methods, ensuring your floors look as good as new.
Buffing With Sandpaper: Smoothing Out Imperfections
To effectively restore scratched heel surfaces, buffing with sandpaper serves as a practical and straightforward method. You’ll want to utilize different sandpaper grits to achieve the best results. Start with a coarse grit to remove deeper scratches, then gradually move to finer grits for a smooth finish. Here’s a simple guide to follow:
- Select Sandpaper Grits: Begin with 80-grit for deep scratches, then shift to 120-grit, and finish with 220-grit for polishing.
- Use Proper Buffing Techniques: Employ circular motions while applying even pressure. This helps in smoothing out imperfections without creating new scratches.
- Inspect Progress Regularly: Check your work frequently to verify you’re achieving a consistent surface before moving to the finer grits.
Final Touches: Sealing and Protecting Repaired Surfaces
After you’ve smoothed out the scratches on your heel surfaces, sealing and protecting the repaired areas is essential to guarantee lasting results. You’ll want to choose appropriate sealing methods and protective coatings to ascertain durability.
Here’s a quick reference table to guide your selection:
| Sealing Method | Description | Application Tips |
|---|---|---|
| Wax | Creates a water-resistant layer | Apply with a soft cloth |
| Sealant Spray | Provides a clear protective layer | Spray evenly from a distance |
| Polyurethane | Offers high durability and gloss | Use a brush for even coverage |
Select the method that best fits your heel surface material. Once applied, allow the coating to cure fully before using the shoes again. This final touch will not only enhance the aesthetic but also extend the life of your repaired heels.
Frequently Asked Questions
Can I Use Household Items for Scratch Repair?
Absolutely, you can use household remedies for scratch treatments. Items like baking soda, vinegar, or toothpaste can effectively minimize scratches. Just blend them, apply gently, and polish to restore your surfaces’ original look.
How Do I Prevent Future Scratches on Heels?
Imagine your heels gliding smoothly over surfaces. To guarantee scratch prevention, invest in heel protection caps or wear protective covers when walking on rough terrain. Regularly check for wear to maintain their pristine condition.
What Types of Shoes Are Most Prone to Scratches?
Certain sandal materials, like soft leather or suede, are more susceptible to scratches, especially when combined with delicate heel types such as stilettos. Choosing more durable materials can help minimize damage and maintain your footwear’s appearance.
When Should I Seek Professional Help for Scratches?
You should consult a professional when you notice deep scratches, significant material loss, or signs of damage affecting the shoe’s structure. If DIY fixes aren’t restoring your shoes’ appearance, it’s time to seek expert help.
Are There Specific Products to Avoid on Leather Surfaces?
When caring for leather, avoid products containing harsh chemicals or alcohol, as they can damage surfaces. Always prioritize product safety; test any new item on a hidden area before applying it to the entire leather piece.